Showing posts with label Rogue Flash Bender. Show all posts

Tuesday, December 23, 2014

NASTY CLAMPS

Lil' Bit Nasty Clamp

A while ago, I got my hands on couple of Nasty Clamps for review, and I have not been able to put them down since. The Nasty Clamps are a very simple idea that is extremely well executed and also made right here in Oregon.

IMG_20130314_182913

What they are is a very strong spring clamp mounted on the end of an articulation arm made up of medium sized segments. At the end of the assembly there is a standard ¼ 20 male mounting thread and locking ring to keep whatever you mount on it tight and stable.

I took the Clamps out for a spin with me on a location shoot at a local radio station where I was meeting my client to take some head shots. We set up in the conference room with a standard portable backdrop and started taking some shots. After getting the traditional staple shots we moved around the room working on some environmental portraits. I wanted to work with the large table in the center of the room but setting up my flashes on it with stands either brought the light way too high or without the stands way too low. That is when I busted out the Nasty Clamps to see what I could do with them in this situation.

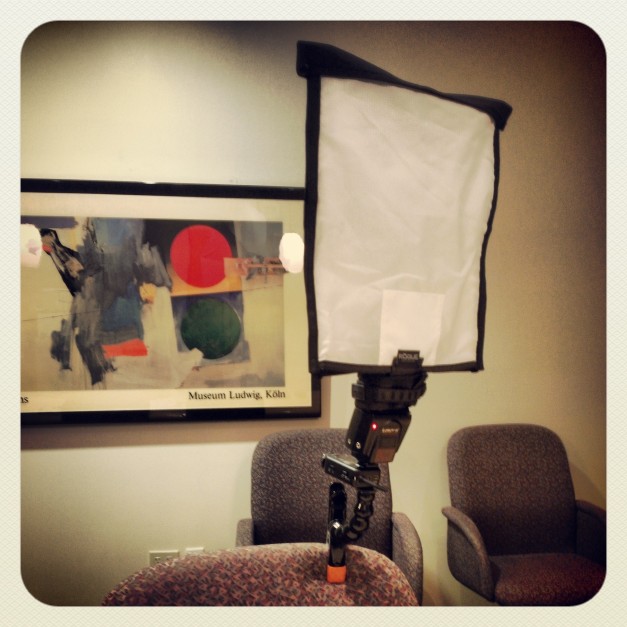
I mounted one of my flashes on the ¼ 20 thread and then clamped it to the back of one of the rolling office chairs next to my subject. Then I placed a Rogue XL Pro Lighting Kit to the mounted flash. I have to admit that I did not think that the Clamp would hold the weight of the flash and the modifier, but it did and was rock solid through all of my position adjustments. Once I began shooting it was very easy to make adjustments to the Nasty Clamp and its’ long multi segmented arm gave me a fantastic range of movement to get my light in just the spot I wanted it to be in, and better yet, it kept it there!

The Nasty Clamp itself is made out of high quality metal with a black coating over it and the tips are coated in a thick rubber like material that gives it exceptional gripping power. The arm assembly is made up of numerous segmented joints that have a ball and socket like interface that has just the right amount of resistance to keep the arm from slipping when objects are mounted to it.

The more I take the Nasty Clamps out with me the more I find uses for them. They come in very handy for holding accent flashes that are tucked away in awkward places. They have totally earned a permanent spot in my bag every time I go out to shoot.  I cannot recommend the Nasty Clamp enough for an everyday item in your bag especially if you are a location shooter.

For more information on the Nasty Clamps and their other products check out their site at www.nastyclamps.com.

Wednesday, March 20, 2013

Setting Up the Shot - Tim Riley


Last week I had the chance to shoot with Tim Riley again. We have shot together many times over the years and it was a blast yet again.

Here is one of my favorites from the shoot along with a set up schematic after the jump...

Wednesday, March 28, 2012

Waves of music in a sea of beer


I have written before about how much I love my Lumopro LP160 and I am going to do it again. Another location that I love shooting in is a nice and dark bar or small club. I was shooting a local band named In Repose last night and I needed to throw in some flashes to help out lighting. I asked the band if they had a problem with lighting the playing area before I did anything. They did not have any problem with it so I went around and placed some flashes around where they were set up.


I love shooting in environments like this when the bands let me light the area as needed. I know that a lot of photographers look down on concert photography with flashes, but when there is not any real stage lighting going on I don't think it's a big deal. I just do what I need to in order to get the bands the images that they are looking for.

I set up three lights around the area that they were playing and set each one to a different group so that I could add them or subtract them from my shooting area. I had a Nikon SB900 set in the very back behind the drummer, another gelled blue with an Expoimaging Rogue lighting filter bounced off a large Rogue Flashbender, and the last one I had on the floor at the front of the playing area aimed up. As I shot the set I was adding and removing the lights via my Opas camera mounted trigger.

As the set went on I was able to turn my flashes on and off as needed from my camera position. If I had not set the flashes to different channels I wouldn't have had this as an option. All of the flashes would have fired every time I shot a frame. The main benefit of shooting this way is that when you change camera position sometimes you will get a flash aimed toward your lens and get an over powering lens flare, so using the channels feature is a great way of controlling this.

The crowd was really into the performance, it was getting rowdy to say the least, and the drinks were flowing. Now what normally happens when a great show is going on along with lots of drinks? Someone ends up spilling something. That’s exactly what happened to one of my flashes. I placed my LP160 on the ground pointed up at an angle to under light the singer and guitar player. What looked like a sea of beer came crashing down and around the LP160 and I thought it was a goner for sure.

It turns out that not only did it survive the waterfall of beer but it also kept on going while it was adrift in the sea of beer that claimed that section of the playing area. No sparks, no burning out, and no misfires.

I have no idea how it survived, but it did. When the show was over I pulled out the batteries, gave it a good cleaning, and let it dry out over night. In the morning there was no evidence of the mishap.

So this and a million other reasons go on the list of why I love the Lumopro LP160 so much. I cannot recommend this flash unit enough to photographers. It has a low price and fantastic connectivity and reliability.

Pick one up and do your best to keep it out of beer tsunamis but if you can't, you have a fighting chance of it making it through.

For more information on this flash unit you can read my review of the LP160 here or head on over to the Lumopro website at www.lumopro.com

Friday, September 23, 2011

LumoPro LP160 – Seamless integration


The more I use the Lumopro LP160 the more I love it. Recently I have been using it as a slave unit with my Nikon flashes. It has worked seamlessly when using the digital optical slave function. With this function selected the flash will ignore the TTL pre-flash and wait for the actual flash for it to fire. Between the S (optical slave made) and the Si (optical slave mode that ignores the TTL pre-flash) it is nearly effortless to add in the LP160 as a manual flash into your shot for added depth of lighting.


With all of its triggering options there is little need for additional triggers. All you need is a single set and the optical modes of the LumoPro LP160 and they fire right along with your other flashes.


I have also been using the digital optical slave function when using my SU-800as the commander of my Nikon flashes in manual mode. When shooting with this type of set up I can control the Nikon flashes from the camera position via the Nikon SU800 and have the LP160 fire with the Nikon's


If you wanted to have remote control of the LP160's power I would suggest that you look into the Jrx series by Radiopopper. I have not used these triggers as of yet but from what I have read and heard they should not have a problem controlling the LumoPro LP160's flash output.


I cannot express how happy I am with this flash unit and how much I recommend it to anyone looking for another flash in their kit.


Tuesday, September 20, 2011

Rogue Gels by Expoimaging


The new Rogue Gels come in two different versions. The first is the Rogue Gel's Universal Lighting Filter Kit and the second is the lighting filter gel kit for the Rogue Grid. Both kits come with 20 gels for a wide variety. The two sets offer the same color choices and options, but two different mounting methods.

The Universal Lighting Filter Kit is just what it sounds like: universal. This gel kit has a Gel-Band that attaches around the flash, along the lines of a custom shaped rubber band. You then take the tabs of the gels and tuck them into the side of the Gel-Band.

The gels are cut so that you can leave a bit of space between the head of the flash and the gels. The Gel-Band is a very secure fastener, it is not going to ever fall off of your flash, and the gels are held tightly and not going anywhere.

That being said, I do wish that the Gel-Band was similar to the Rogue Tension Strap found on the Honeycomb Grid. The way that the Tension Strap mounts is great and with a very small modification I am sure that it could be converted into a gel holder. But I am sure that would raise the cost significantly so it is all a matter of trade off.

The Rogue Gels lighting filter kit for the Rogue Grid is perfect in its integration with the grid. You place the gel between the bezel and the honeycomb. The two pieces line up via the grooves on the bezel and the honeycombs. It is super easy to put together and the gels cannot go anywhere because of the grids design.

In the spirit of keeping this “fresh” and trying new techniques, I decided to use these gel kits to enhance the natural tones of the location and the model. By putting a gel on my flash unit mounted in a Westcott 28” Apollo I filtered the light bringing it to a nice warm tone that complimented the model and the tones of the location.

Another technique that I tried was placing an amber gel on a flash and then bouncing the colored flash off of the wall bringing in again some warmer tones to the shot.

These two gel kits are fully capable of dealing with not only color correction but also with dramatic lighting situations. They are a truly comprehensive gel set. With 20 gels in each of these kits you have a wide range of colors to blend in or change altogether. I tried mainly to enhance the colors present instead of completely changing what was there, but these make it easy to accomplish either task.

One of the things that I love about the Rogue line is that they are small modifiers that have big results.

I always make sure to have these modifiers in my kit, every shoot. Their sublimity has a huge impact on the shot, and I love having them as an option providing so many different possibilities.

At the end of the day I find both the Rogue Universal Filter kit and the Rogue Gels lighting filter kit for the Rogue Grid just as versatile as the other light modifiers in the Rogue series. I believe Expoimaging has created a very well designed line of flash modifiers that every photographer should try.


Thursday, September 8, 2011

Zoom vs. Prime


In case you missed it I lost my favorite zoom lens to a massive fall earlier this week. Now I am stuck in the age old debate of Zoom vs. Prime.

I have found that I go to my 50mm in a lot of controlled shooting situations, but I have also fell back on my old 28-70mm as a sort of catch all lens.

Both sides of this debate have very compelling reasoning to them. So lets hear what all of you have to say about the matter. You can leave a comment here or feel free to email me at info@vanishedtwin.com and let me know where you stand and why.


Friday, September 2, 2011

Basic off-cameraflash workshop


Tomorrow is the workshop, so if you would like to attend all you need to do is register by sending an email to: info@vanishedtwin.com


Saturday, Sep 3, 2011
Begins at 5pm
Tryon Creek State Park, Portland, Oregon 97219


map


This workshop is an outdoor introduction to off camera flash. We will be running through the beginning basics of getting the flash off of the camera and then learning how to control it in different lighting scenarios such as the setting sun and outdoor locations.

This is a free workshop, but you need to register in order to attend. Please email info@vanishedtwin.com to register or for any questions.

This is going to be a hands on workshop, so you will need a camera, flash and a trigger.